

All Activity
- Today
-
To me, this was a good starting point https://support.fender.com/en-us/knowledgebase/article/KA-01903
-

Does anyone else take their basses to weird places for photos?
Bagman replied to GarnetDK's topic in Bass Guitars
Hi , is that a GUS Bass? -
 Toot
Toot -
I've wondered about doing this for a few months and never had the time to think this through. Background As part of the Basschat 8" speaker thread, I needed to attach a speaker grill to some risers. I wanted the speaker grill to be easily detachable without using any tools, such as an Allen key or a screw driver. I did look at quick release fasteners but they didn't quite work for me, so I thought I'd make some gnurled knobs using M3 bolts. I've made loads of these type of knobs before and have always followed the same pattern, design the knob, then insert a bolt after printing and use a little plug to fix the bolt in. Here's an example, the bolt goes through the hole and I simply glue a plug on top. Dead easy BUT it requires glue and a plug. So I wondered if I could design a knob that has the bolt put in as part of the printing process and not afterwards and therefore no plug is needed? This technique might be useful to somebody else so I thought I'd document it so somebody else can benefit from it. This is a little advanced in the number of steps and it might well be partly Prusa specific and Octoprint specific. Solution And this is it. This is a cut away of the knob and you can see where the head of the M3 bolt would sit. It looks like there is already the screw element of the bolt already in place, this is the long column underneath the knob head and this is actually never printed, thought it is exported to the slicer. The column is there to position the knob head correctly in the vertical axis in the printer slicer, in my case Prusaslicer. There is actually two different bodies in Fusion 360. The long column is 3.25mm in diameter and the hole in the knob head is 3.25mm as well. In this case it's a little under 16mm long as I will use an M3 16mm Hex headed bolt. Technically the knob head has zero overlap with the sacrificial column, this is important. Both bodies are experted to Prusaslicer as a single component. In Prusaslicer they are then converted to Parts, not Objects in the right hand mode pane. If you convert them to Objects, the head loses it's vertical position. The bottom of the knob head is painted for manual supports, that's the blue bit below. I used a Smart fill and as the knob head base is flat, that works well. Select the sacrificial column and in the Mode Window add in "Infill" and "Layers and Perimeters", using the right mouse click. This creates these options JUST for the sacrificial column. This presents these two options at the bottom of the Mode window as well Change the settings to 0 for everything in these two windows. This tells Prusaslicer not to print anything for this specific part, the sacrificial column. The column is still there holding the knob up, but doesn't exist for printing purposes. Change the support options to "Generate support material" and turn off "Auto generated supports". This is really important. Press the "Slice now" button and you get this. However your job isn't done yet. Using the layer inspector, slide down the layers until you are one layer below where the head of the bolt would be This is one layer higher and you can see the blue indicating an "Overhang perimeter" in Prusaslicer. If you can see the blue, you need to go one layer lower. Right click on the Layer Inspector and select "Add Custom G-Code" You need to add in specific G-Code here to tell the printer to pause. I use Octoprint and a pair of Prusa Mk4's (not the MK4S). The below works for me, but if you have a Bambu or an Creality this might not work, The gist of the code above is: a) Move the printer head to X=10 and Y=200, basically away from the part you are printing. Thats the G1 element. b) Make three 1.5sec beeps - Thats the M300's c) Disable the stepper motor timeouts - This is needed for Prusa's but I'm not 100% certain as to why I used this command as I wrote this a few years ago I think that this was because if the stepper motors timeouts aren't disabled, then if I wait for too long, the stepper motors are disabled. and aren't fixed in position using a steady current and if you knock the the printer, the printing head won't go back to the exact same position. d) Enable the stepper motors - Put some current in the stepper motors to fix the position of the plate and the head. e) The @pause is an Octoprint command which displays pause on the Octoprint (and Octodash) display and then allows you to press "Resume". This is the bit where you then insert the bolt. Kinda important. An email is also generated in Octoprint and sent to me so I don't have to watch the printing. d) The M105 returns the print head to the correct temperature after the pause (and the insertion) of the bolt. When the printing head temperature is back to the right temp, the printer carries on. I turn off the temperature as it might be an hour before I respond to the email. You now have a knob with an M3 bolt embedded in it, no glue, no plugs, so it's a lot stronger and neater. This looks like a lot of fuss and steps but it's probably 90 secs to go through to setup. Once you've set it up, you can then "Add Instance" and you can create four of them in a few seconds. Hope this helps somebody Rob
-
Don't do it. USB-rechargeables have built-in electronics that make a lot of audio-band noise. A decent onboard bass preamp should last at least some months, if not a year or so, on a good battery if you turn it off when not playing. An alkaline 9V battery has a capacity of some 500mAh and a decent preamp should draw no more than 1 or 2 mA. That's hundreds of hours of play time.
-
This is very nice! You and I must have similar tastes in old Fender basses because I would have done the same thing. I know it sounds good! Congratulations
-

 Chris you are fast lol. Seems like a great deal.
 -
My initial answer was No, but actually it’s Yes zoom b2 ampeg, full cab plus some compression
-
Just post your question here 👍
-
 I’ll get back to you in the morning and let you know
 -
 Hi Paddy, what's the weight? Cheers
 -
Mine is slightly overdriven and on my parametric equaliser a slight boost at 80hz, slight cut at 250hz, big boost at 780hz, big boost at 620hz, slight boost at 1.5khz, these frequencies may vary very slightly but generally this is what works with my current band and I go for an overdriven mud heavy tone.
-
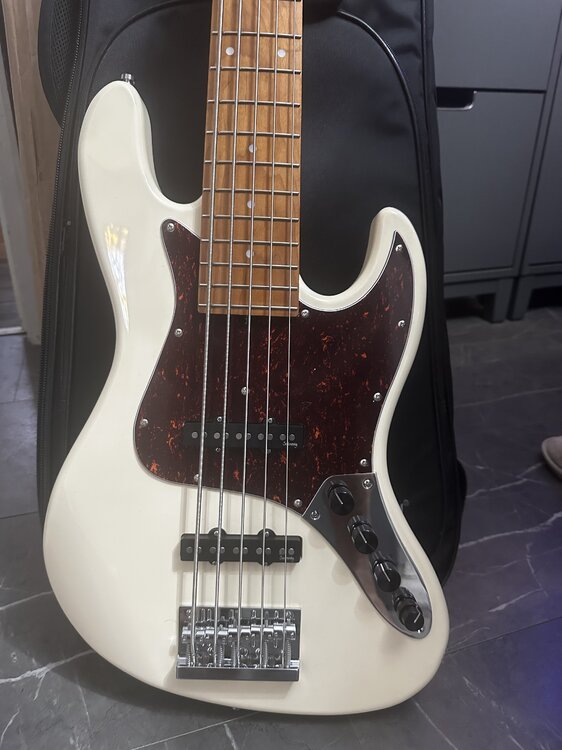
2nd Gen Sadowsky MetroExpress Jazz 5 string in Olympic white with tort. Upgraded preamp with VTC, in good nick - has been gigged but looks really nice and clean, just may be the odd superficial mark from general use - it looks absolutely stunning tho. Roasted maple neck & fretboard, 18mm spacing (upgrade to Metroline bridge for 19mm spacing - works fine in this neck if that’s what you wanted). Absolutely fantastic B string - really good, which shocked me, even tone all over the bass, plays amazingly well with a great neck - this is worthy of the Sadowsky name and is night and day better than the first gen (I’d say it’s what you’d have expected Gen 1’s to be) Looking to trade for a decent P Bass (I can add money on top for the right bass) or straight sale price - £595 Comes with Sadowsky padded gig bag - shipping can be arranged for £20 via DPD
- Yesterday
-

NUX Melvin Lee Davis DI/Preamp *£100 posted*(brand new)
dub_junkie replied to 40hz's topic in Effects For Sale
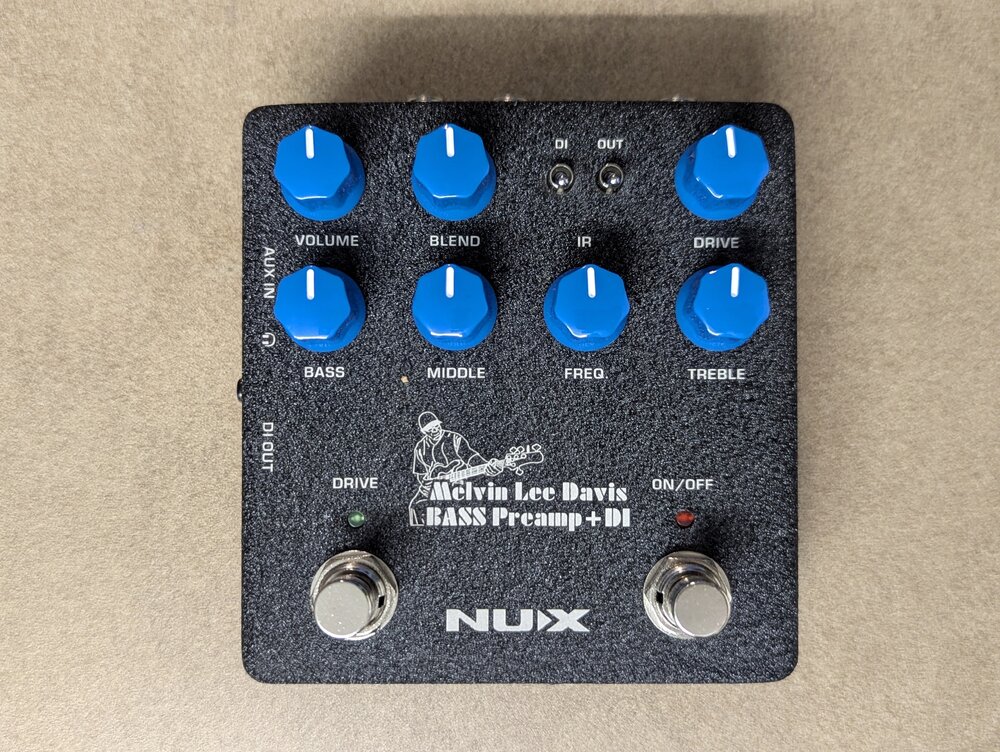 I have one of these. Well thought out preamp pedal and really solid build
 -
Why the screwdriver issue? Why not simply change the battery holder for one you can open easily without tools? That’s a whole lot easier Click I’ve had my sire 9 months and I’ve changed batteries once - why make your life hard doing routing ? Sire has these x 2
-

Does anyone else take their basses to weird places for photos?
Geek99 replied to GarnetDK's topic in Bass Guitars
Picture 2 is disqualified as the title is about “basses” and that clearly isn’t one. puzzled that the cuckoo has so many frets though -
Does anyone else take their basses to weird places for photos?
Geek99 replied to GarnetDK's topic in Bass Guitars
that looks unusually clean for anywhere in Nottingham. I’d be expecting to see vomit, and maybe squashed kebab ? -
I first picked up a white/white/maple p bass copy in 1990. I carried it all the way from a music shop near Colchester castle (in its box) to the train station (seriously long way) and then by train to Chelmsford, where I once again walked ** … all the way across town to my flat where I played it acoustically for two days before I decided it sounded crap without an amp. More saving up … ho hum … ** there are those with supportive parents who would be thinking “this is 1990, not 1820… surely a parent could…” no. They never encouraged or helped in any way whatsoever (will someone please stop playing that f***ing violin?)
-
My 2p: Dr strings Lo Rider, or High Beams if you want extra extra zingy.
-

Remove decal off a painted headstock
NancyJohnson replied to Brian18242's topic in Repairs and Technical
Remove the machine heads and ferrules. Assuming the decal is under clear coat, gentle use of a high grit wet and dry to get through the clear and then the transfer. You should be able to just apply a Fender decal direct to the headstock and clearcoat over it to make good.- 1 reply
-
- 1
-

-
😮💨that was a close one …
-

Vocal Microphones, what are you using?
Chienmortbb replied to Phil Starr's topic in PA set up and use
The Solo is made in the UK. -
Hey guys, batch 2 is being express shipped to me today so hooe to inspect the necks towards the end of the week. I'll be sending each of you photoand video and a set of heel measurements to confirm everything is as expected.s
-
It's always interesting to look at specs but I don't thnk you can reliably compare between brands. Firstly the power ratings are for the amps not the speakers. You can put a 2,000W amp into a speaker but if the power is then managed by DSP then the speaker is protected from that power ever reaching the speaker. There really aren't many 15" speakers that can handle anything like that sort of power. To do that over long periods you need plenty of coil area to dissipate the heat so bigger voice coils are needed. Reckon 4-600W for a 3" voice coil and 600-1,000 for a 4" voice coil. Typically sensitivity of a mid priced 15" speaker with a 4" voice coil will be arond 96db /W so at 1,000w that is 126db maximum output. Looking at the RCF drivers they are over quoting by 6db at least, I know this because they also sell the speakers as bare drive units. At one point Yamaha were over quoting by 9db. I wouldn't even like to say from your pdf which of those speakers would be the loudest in practice. Be careful about basing your decision upon specs. It would be great if you could try those 12" EV's. It's so hard to get to listen to any of this gear even in London. it might be worth trying some of the DJ dealers but borrowing gear is always better as you can set it up the way you want. As to reviews: most people are in love with the kit they just bought, will highly recommend it but mysteriously upgrade a year later . It's all a bit of a leap in the dark. Having said that none of these brands are making bad kit, RCF and Yamaha are at the top of their game I've probably been looking at the same on line reviews of the lates offerings from EV and they are looking good. I just haven't heard their latest stuff live yet so I've no opinion. I wasn't really recommending the RCF 905 btw. I was just trying to answer your two 12's or one 15 question. I have the 905, its a good sub but i have no idea if something else would be better/as good.
-
EHX Knockout? It's surely possible to fit the circuit into a less gigantic box:


.thumb.jpg.52236fb3fc5f7192c6d4345d6b9bd2d8.jpg)