

All Activity
- Past hour
-

What are your irrational prejudices? I have some bonkers ones...
SteveXFR replied to kwmlondon's topic in General Discussion
Im not sure but it had a lot of miles on the clock and too many previous keepers -
 No, thanks for your offer! I am not into 6 String basses.
 -
The problem was the sound post, it was way too tight and choking the bass. The bridge also had some problems but he did some creative woodworking on one leg and set it up so the adjusters work properly. I had asked him to check the bridge position and he decided to leave it in the same place. Bass plays a lot better both arco and pizz and is louder with a better sound, strings (Spiros) are roughly 5,6,7,8 mm but I may change that a bit, gotta love adjusters. All in all money well spent but a bit tired today after a 9 hour 800km round trip yesterday into the craziness of Toronto's traffic, happy to get back up north where things are much quieter.
-
From last wednesday's rehearsal(!)
-
 Maybe mix in a very small amount of amber stain with a compatible varnish.
 -
Publicity shots ahead of Fridays Fractured Persona gig!
-
Thanks for this! He's absolutely flying with it, he spends so much time playing it's incredible! Not even a year in, and I think he'll be better than me soon 😅 Got him his first proper bass at the guitar and bass show back in March, a Dave Ellefson 5-string Jackson, and he's wanting a new bass for his 16th next month! Here we go..... #GAS
-

What are your irrational prejudices? I have some bonkers ones...
prowla replied to kwmlondon's topic in General Discussion
That was ignorant! 🙂 -
As someone who loves Mustangs but doesn't really like PJ setups at all, this thread is giving me very mixed feelings...
-

1976 Precision - All original REDUCED £2250
Nibody replied to Dannygno123's topic in Basses For Sale
 Read up on it and we have been in contact with the ME Society currently on waiting list for the local ME Specialist team. But will take any advice - PM me
 -
Re NuX I use it on my Shen SB 100, my old Czech ply and my Yamaha SLB 200 and it is great. I have used it for home practice, at band rehearsals (jazz and bluegrass) and at gigs going into an amp, the jazz band's Bose or DI into a house system. You can charge the units from a wall plug or from the sturdy case that they are stored in, a handy feature. I must have had them for at least a year now and have had no problems. I don't know all the technical stuff but you can find that easily enough, I do know that the system is simple and sounds good and that it works for me.
-
 I do exactly the same thing, I’ve even used it as my main amp on some occasions, great little amp GLWTS
 -

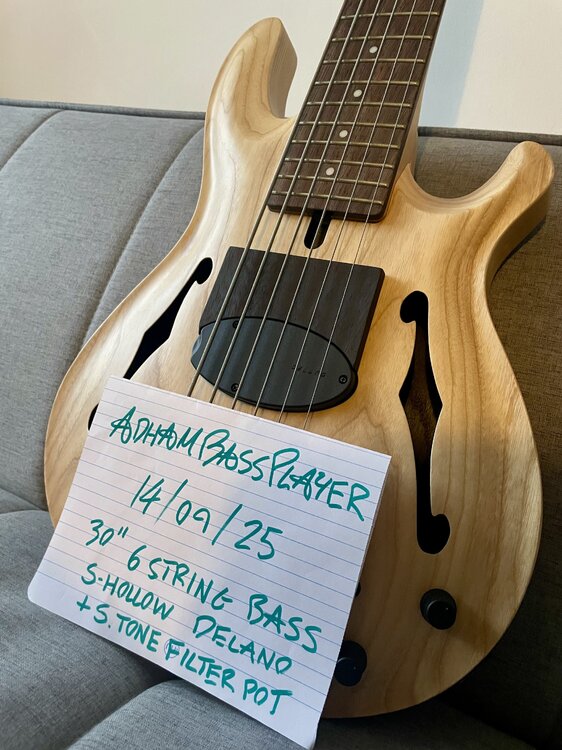
Maruzczyk/Mensinger Joker B 6P Hollowbody 30" (MINT)
BassKS replied to AdhamBassPlayer's topic in Basses For Sale
 Beautiful.
 -
Did some pore filling. And stained the back and sides a mix of yellow and oak. To give it an aged Korina look. After lots of spraying and sanding layers of clear, I could apply the decals. The top was quite a bit of a challenge. Customer wanted a teal blue sparkle finish. The only proper way is to make it a candy finish. First a layer of coarse metallic flake silver. Then a layer of transparent mixed with silver particles. Then the cobalt blue transparant layer to achieve the teal/turquoise look And sealing it off with several layers of transparant. The matching headstock got the name decal Laser cut the pearloid pickguard Modified the Schaller Grand Tune octave tuners to save some room
-
Then I came up with a crazy idea. I had the big tone chamber on the lower horn. And I had the extra large controls cavity with some spare room for a little extra feature. Why not put a led light in the lower wing? I did a little test with a discarded pickguard... Let there be light. And there was light
-
Shaped the heel of the neck to fit the pocket Checked the neck joint angle Routed the pickup cavity Drilled the holes for the volume pot, kill switch and jack output Glued the neck in the pocket
-

Fender Jazz graphite necks £450 - Batch 1 order slots now filled.
Rich77 replied to Kiwi's topic in Graphite neck - ordering
Is there a timeline? Not too bothered really just being curious -
Filled the gaps underneath the fret tangs with a mix of rosewood saw dust and wood glue And drilled the holes for the side position markers. Glued them in Et voila! Luminlay glow in the dark dots. Switched back to the body, to route the neck pocket.
-
Then shaped the neck profile. And headstock shape Drilled the tuner holes
-
After the special inlay was done, it was time to put the frets in Made the truss rod access slot plus cover Then prepared the neck to glue the fretboard on. Tacked in a staple. And cut it off 1 mm proud of the neck to leave two sharp pins. These help to prevent the fretboard from sliding in the wet glue. Then glued the fretboard on. Using the strips of inner bicycle tubes for clamping.
-
Customer plays in a Cheap Trick tribute band. And as you may know those guys have something with the checkerboard pattern. He asked me to make a checkerboard inlay on the 12-position. So I made a drawing of 5 x 5 mm blocks. And laser cut a white piece of acrylic and a black piece of acrylic. Then made a lay-out of the black and white blocks combined on a piece of sticky tape to keep them from flying away 😉 But realised that was not going to work to keep them tight against each other. So I made a little template with a rectangle that would keep them tight against each other. Cut out a "swimming pool" in the fretboard. With a knife and some chisels. Then glued them in. Using super glue onthe fretboard. And a piece of high tack (aluminium) tape to keep them together. When the glue had hardened I sanded it to flush to the fretboard in the desired radius (16") Pretty happy with the result
-
The switched back to the body again. Routed the outline along a template (sorry no pics) And then I realised I had routed the controls cavity wrong. So I made a new template and routed the corrected shape. Didn't even look half bad 😉 Rounded off the edges on the back. Routed the profile for the binding Glued in the pearloid binding. Used acetone instead of glue, because I knew I was going to stain the sides and back. (Stain does not work on glue remains) Glueing the binding always requires extra attention on the corners. I use strips of inner bicycle tubes to clamp them till they're dry Looking good so far
-
Switched to the neck next Routed the channel for the carbon reinforcement strip in the middle The routed the channel for the two truss rods. I let them taper to follow the taper of the neck itself Sawed the head stock angle. And planed it smooth. And sawed the back side of the headstock in the desired angle. Still needed to plane/sand that side to the right thickness too.
-
Yesterday at the Wirksworth Arts Festival in Derbyshire. The Desperate Cowboys did a 45 minute set as part of an all-day multi-act show. It’s a small town with grim parking at the best of times, so park-and-ride systems were set up from the nearby quarry sites. Consequently, it was my Taylor Mini Bass straight into the supplied PA. The Taylor has enough character and quality to sound good enough though that setup, so no complaints. Initially, we were disappointed to only get a midday slot. However, given the way the weather went, we were quite happy. I even had to swallow my prejudices and play in a hat! I think I’m done now for outdoor gigs in Derbyshire until next spring.
-
Bought a nice two-piece slab of White Limba (aka Korina) And routed the tone chambers Routed the controls cavity. And later realised it had the wrong shape for the lay-out of the controls that I had in mind for this bass... Sawed the f-hole in the matching two-piece top (White Limba/Korina) And then glued it on. You can never have enough clamps 😉


