


Mediocre Polymath
-
Posts
223 -
Joined
-
Last visited
-
Days Won
1
Content Type
Profiles
Forums
Events
Shop
Articles
Everything posted by Mediocre Polymath
-
I've quit facebook so that I spend more time here!
Mediocre Polymath replied to joe_geezer's topic in General Discussion
I've always had a fairly uneasy relationship with social media. I am of the right age to have joined facebook when it still felt like something fun and somehow private – around 2006, I think – but it jumped the shark some time in the late 2000s or early 2010s and never came back. I've not deleted my account, not really sure why, but I've also not looked at it in about seven years. I dabbled with a few of the other platforms, but always found they got both boring and addictive after a while. My dislike of the Skinner-Box psychological manipulation that's ubiquitous on the modern internet is actually what attracted me to this place. It's a forum. There are posts. You open the site and look at what's been posted. If there's something interesting, you read or respond. If there isn't, you close it again. Basschat isn't painstakingly engineered to monopolise my attention, it doesn't use the latest scientific research to try to serve me targeted content, to entice me into scrolling or paging through or whatever. It's a website. With stuff on it that I can look at, or ignore. It does have the unfortunate side effect of leading me to buy more gear, but that's a trade-off I'm willing to make. -
I recently rediscovered the Ben Folds Five Live at West 54th set, which is a great snapshot of them as a super-effective power trio. With Cake, apparently that style of "whole band" arrangement was something they always insisted on, much to the annoyance of various producers. John McCrea likes for each instrument to be playing something distinct, and for it to be possible for a listener to hear each part in isolation. As an aside, I was fascinated to discover (when I first got into them about a decade ago) just how completely the contemporary music press hated Cake.
-
I don't think you'd call it virtuoso playing, but I've always really liked Gabe Nelson's stuff on Cake's 1998 album Fashion Nugget. The band's arrangements are deliberately sparse and clean, and Nelson's bass always sits alongside the interlocking guitar and horn parts, rather than just being a rumbling noise underneath them. "Let Me Go" is a particularly good example, with a wonderfully bouncy, gappy bass line and the two very distinct guitar parts.
-
 Aw thanks. And yeah, I might be back in touch, especially as you're on the same train line as me, just much further out.
 -
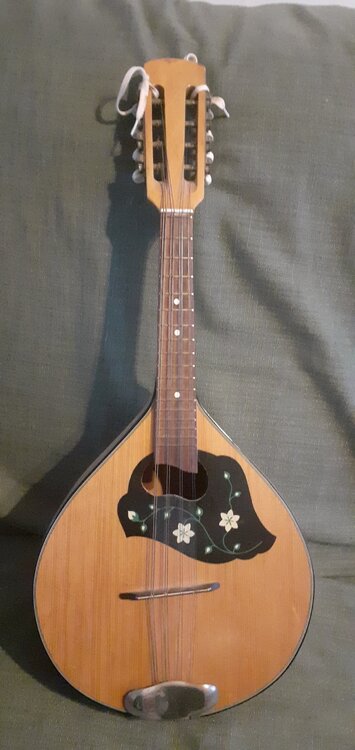
That's very tempting, but I can't be going around buying myself presents with Christmas on its way. If nothing else, I'm turning 40 soon and it's entirely possible that my wife may have gotten me a mandolin. My dad used to have the bowlback version of the same mandolin (with that stenciled on graphic on the front). Also with a bowed neck. It probably wouldn't be too hard to take the fingerboard off and rout it for a carbon fibre rod.
-
Your best (and worst!) bass gear purchases of 2025?
Mediocre Polymath replied to Al Krow's topic in General Discussion
My best bass purchase – also my only major one – was the battered Hohner "The Jack" that I bought off here in June. It gave me a fun project to while away the summer afternoons and has turned out to be a really lovely bass. Here's the "before" pic. And here's the after: I've been pleasantly surprised by how good it sounds. My expectation was that it would be light, practical and a bit bland. And, well, it sort of is, but in a good way. I've never played a bass with p-bass pickups much before (these pickups are reverse Ps in humbucker cases), but I'm starting to get the appeal. My other fretted bass has a MM pickup and a really aggressive sound. It sounds amazing when everything's just so, but can be very finicky. The Hohner just sounds, er, solid, I guess. A nice smooth sound, almost like it's been compressed and tweaked already. I can just run it straight into my interface and be perfectly satisfied. The worst purchase would be Montana Color "Fire Red" paint. This turned out to be a shade of red no-one's ever seen in a fire or indeed anywhere outside of the Barbie dream house. -
Yeah, I once fell foul of this at a band rehearsal. Accidentally pressed the little button that makes everything go wrong when down tuning to drop-d. Got about 8 bars into a song before I had to wave it off in a panic.
-
Does anyone have any good recommendations for a person who wants to learn about electronics – specifically audio circuits? I'm looking for something that doesn't assume you know anything already. If I could get Gromit's copy of Electronics for Dogs, that would be ideal.
-
-
If you already have the tuner and DI, you could probably do worse than the combo of an LMB3 and an EHX Bass Soul Food, which is the pairing I use. I'd say @Homatron's estimate of £60 is probably a bit on the high side for the LMB3. I got mine in mint boxed condition for £40 a few years ago, and there always seem to be a few kicking around. The Soul Food is a little more rare, but they show up on here from time to time.
-
Disappointing new bass day...I would appreciate some opinions.
Mediocre Polymath replied to N64Lover's topic in Bass Guitars
Speaking as someone who finishes instruments in a plastic greenhouse in my garden, using spray cans I buy from the local DIY shop – that's not an acceptable standard of fit and finish for a pro-level instrument. The discoloration on the binding isn't great, but forgivable, likewise even the light chipping around the neck pocket, but those tool marks in the finish? No. Even making an instrument for myself, I think would have probably been a do-over. -
Weird coincidence. On the day that it was announced G&L were no more, a scrote in France stole all The Beths's touring gear, including the G&L Fallout that Liz Stokes has been playing since the band started. They're all playing Fenders for the rest of the tour, borrowed off their support act.
-
Interesting little postscript to the general sentiments about G&L being a bit crap at marketing/artist relations. I saw awesome kiwi pop-punk band The Beths at the Roundhouse last night (they were amazing). For the last seven or eight years, their singer/songwriter Liz Stokes has exclusively played a black G&L Tribute-series Fallout (I'm pretty sure it was the only electric guitar she owned). As far as I know, G&L have never mentioned her or done anything with her. On this tour though, Liz was playing something new – a coral pink quirky looking sorta fenderish thing that I don't recognise. The Fallout was relegated to a stand at the back of the stage and only used for one song (presumably in an odd tuning). Feels like an opportunity that was missed.
-
Hohner "The Jack" Restoration
Mediocre Polymath replied to Mediocre Polymath's topic in Build Diaries
Thick from front to back. At least, compared to my own custom basses. I think those have a pretty normal profile, but it's been years since I made them, and they might be thinner than normal. The nut width is 38 mm, like a jazz bass. At least, it is on the one I have. -
Hohner "The Jack" Restoration
Mediocre Polymath replied to Mediocre Polymath's topic in Build Diaries
Neck thickness is one of those things that I don't actually have a strong opinion about. I'm as happy playing a thick neck as a thin one, it just took me by surprise. -
That's sad to hear. I agree with what has already been said though, about how they've always seemed a little held back by their sort of internally contradictory relationship with the idea of innovation. They pitch themselves as high tech and the final refinement of the Fender-style design, but they're also trying to trade on their connection to the broader Fender history to an equal or greater extent. As a side note, I've always found it odd when people have such visceral reactions to headstock shapes. Unless it's something deliberately oversized or covered with overbearing ornamental flourishes, I really don't much care. It would never have occurred to me that a little kink in the lower curve of an otherwise conventional four-in-line headstock could elicit such strong reactions one way or another.
-
That could certainly work, especially if combined with the cauls to distribute the pressure. The existing bridge could be used as a template to mark the holes you'd need to drill in those pieces.
-
That makes things a lot easier. Here's what you'll need – – Two or three long-opening clamps. I used a pair of clamps I had lying around with a 12.5 cm depth – Various grades of sandpaper (up to like 400 grit) – a very sharp and quite small scraper – perhaps a scalpel or craft knife – tools for making simple camping cauls (saws, rasps, etc.) – decent masking tape (like frogtape or similar) – some cheap chopsticks (ideally PTFE rod or something like that) – Some offcuts of shelf timber or something for making cauls. – a round needle file (can be cheap and crappy) – Some double-sided tape (the weaker the better) As for glue, you could certainly use hide glue, but it is a pain in the arse to work with. I've not touched the stuff in a long time. When I did the bridge replacement, I just used standard, red-label Titebond, which is what I use for all my instrument building work. The first thing you'll need to do is carefully clean up the area under the bridge. This is what it looked like on the guitar I was working on after I'd heated and levered the old bridge off. You'll want to mask off the area of the finish that isn't under the bridge, and then carefully scrape and sand away the old glue and any finish that's under there (you want the bridge to go onto bare wood). You don't want to go too hard, because the wood is thin and pretty delicate. Here's an "after" photo from the instrument I was working on. You'll also want to do the same for the underside of the bridge, being very careful not to sand a curve into the base. I didn't have to do that on the instrument I was working on, because I made a new bridge from a rosewood blank (the old one was mangled by having been originally right handed, then adapted badly to play left handed, then adapted slightly more competently to play left handed and in tune, then finally adapted badly to play right handed again). To glue it up you'll need to make two clamping cauls. One sits on top of the bridge and has essentially the inverse of the shape of the bridge carved into it, the other sits inside the body on top of the bridge plate (the solid piece of wood, usually maple, that supports the bridge. I don't have any clear pictures of the top caul, but you can sort of see it in this picture of the gluing up process. It doesn't have to be perfect, just roughly the right shape to make solid contact in the middle and at the ends. It has some cork sheet glued to the underside to spread the force more evenly. This could be replaced by anything soft really – a piece of an old tea towel, some carboard, etc. The inner caul is a maddeningly fiddly thing to make and fit. It's a little triangle of wood that you need to keep the clamps from crushing the x-braces that meet just in front of the bridge. I made mine by shoving a piece of modelling clay into the back of the x-brace joint and using that to very roughly guess the angle the braces meet at. The whole process of making the caul, stucking masking tape to the inside and then sticking the caul to the tape is fiddly and frustrating. It helps to have a mirror or to put your phone inside the guitar with the front-facing camera turned on. You'll end up with a lot of pictures on your phone that look like this. It you have some PTFE rod you can cut some short lengths to go in the outer string holes to line the bridge up prior to clamping. I remember lining things up using some chopsticks, but I can't remember if I kept them in (cut down) during the clamping process. If I did, they would have been liberally smeared with wax or vaseline and possible wrapped in baking paper to stop them getting stuck. After brushing on a fairly generous layer of glue on both surfaces, clamp it in place (wiping up the squeezeout) and leave it for a day or two. Once it's set, get a needle file and clean the excess glue out of the holes, taking care not to get over-enthusiastic and stab a hole in the top.
-
Is the current bridge still sort of attached or has it come completely off? I've only done one bridge replacement, so I'm hardly an expert, but I can probably provide some tips.
-
4-Pos/3-Pole Rotary Switch for two pickup wiring
Mediocre Polymath replied to Immo's topic in Repairs and Technical
Interesting. I had considered wiring a variable resistor into the series position, so I could adjust the output. I decided that a) I quite liked the "onboard boost" effect, and b) I couldn't be arsed. This is a recurring problem with me and instrument wiring. Generally by the time I get to the wiring stage on one of my instruments, I've put in 40-60 hours of work over several months and I just want the damn thing to play. Finesse tends to go out the window. -
4-Pos/3-Pole Rotary Switch for two pickup wiring
Mediocre Polymath replied to Immo's topic in Repairs and Technical
I don't think so, no. I've not done any serious electrics stuff in a while, so I can't make sense of either diagram right now (despite drawing one of them myself). I just know that this works and that I wrote it down at some point. One bit of advice I would add is that the sealed plastic rotary switches that most vendors sell aren't very robust. I've had two fail now – not catastrophically, but annoyingly (having to wiggle the switch to get position 4 to engage, that sort of thing). I don't know if you can get heavier duty three pole switches anymore though. -
4-Pos/3-Pole Rotary Switch for two pickup wiring
Mediocre Polymath replied to Immo's topic in Repairs and Technical
Aha. Found it. I had a copy buried in my photos folder for some reason. -
4-Pos/3-Pole Rotary Switch for two pickup wiring
Mediocre Polymath replied to Immo's topic in Repairs and Technical
I've done exactly this on a few guitars. I'm not near my computer, but I have diagrams somewhere. I'll have a look in the morning. -
It's an interesting subject, I've answered based on my past experience. One thing I'd mention is that the current questions make it hard to explain a position like mine, where I had problems with pain in the past but they've largely cleared up now.
-
Hohner "The Jack" Restoration
Mediocre Polymath replied to Mediocre Polymath's topic in Build Diaries
Not sure, probably break even on my costs but I'd be surprised if I got anything more than that. I have no immediate plans to sell though. I had a look online while I was working on this thing – checked out various listings on reverb, ebay, etc. It seems that no-one is really sure how to price these basses at the moment. Some slightly manky ones are on offer for £250-350, while others are listed for as much as £800. The Bass Gallery has one that they recently got in for £550, though it looks to be in very good condition. Almost every listing has a decription that is riddled with bizarre inaccuracies, and there doesn't seem to be any significant difference in pricing between the active, passive and later "Custom" models (with the J-style pickups). Curiously, Hohner's own website says these basses were first made in 1988 but this one has a 1987 serial, and there are a lot of posts online from people who claim to remember seeing/owning/selling them as far back as 1986. I think the rather forgotten nature of these instruments reflects the abrupt cultural shift that happened in the early 1990s. The eighties were, I'd argue, the last period (in the West at least) when "new" and "hi-tech" was generally considered to be automatically better than "old" and "traditional". The headless bass was a classic example of that sort of technological optimism – it was marketed as the improved, more rationally designed and technologically advanced form of the electric bass. The bass of the future! When grunge hit the cultural mainstream, that was all flipped on its head. The most important thing (certainly in music) was the appearance of authenticity, which meant a sort of outsider aesthetic complete with old, second-hand guitars, clothes from charity shops, and so forth. A glossy, hi-tech futuristic bass suddenly looked corporate and lame. As a result, I think these models experienced a calamitous fall from the height of cool to deeply, profoundly uncool in a matter of a few years. I suspect that, despite being really well made instruments, their value on the second-hand market is still – even now – recovering from that initial blow to their reputation. -
Hohner "The Jack" Restoration
Mediocre Polymath replied to Mediocre Polymath's topic in Build Diaries
Some better pictures. Perhaps one day I'll re-do the chemical blacking on the metal hardware. I probably could get the finish a bit shiner and less scuffed looking, but I've been working on this thing for about two months, and there comes a point where you just don't want to sand things anymore. I feel good for having revived this bass and, if I may say so myself, made it probably a bit nicer than it was when it left the factory when I was about 2 years old. I think, all told, this project has cost me something like £250-300, so not a sensible financial decision but still not a huge outlay for a very nice instrument.


