


rwillett
-
Posts
2,129 -
Joined
-
Last visited
-
Days Won
7
Content Type
Profiles
Forums
Events
Shop
Articles
Everything posted by rwillett
-
Been there, done that, got the frostbite....
-
Planet Rock - Top 500 - Interesting listeners votes
rwillett replied to rwillett's topic in General Discussion
It's opened up some new names to me so that's good. As with all "best" lists, it's highly subjective and causes lots of thought / discussion / arguments / flame wars. I was surprised The Pretty Reckless didn't have an entry but as somebody posted earlier "twas ever so". Personally speaking I'd love to get a full dump of all the votes and the demographics behind the voters. I didn't see the voting page at all so no idea what information was requested by Rayo but this is a goldmine for them as they get told clearly what music to play and in which proportions. They can hit their target audience pretty quickly without spending lots on market research. This was probably the aim all along 😁 -
Planet Rock - Top 500 - Interesting listeners votes
rwillett replied to rwillett's topic in General Discussion
Yep. That's either the extended and remastered disco mix version collaboration with The Cheeky Girls OR Planet Rock cocked up. It doesn't really affect the numbers much as it should be in the 1960s stats and not the 1990s. I didn't check every year apart from checking the upper and lower bounds as I don't even know some of the bands. Rob -
Planet Rock - Top 500 - Interesting listeners votes
rwillett replied to rwillett's topic in General Discussion
As would Darren.... -
Planet Rock - Top 500 - Interesting listeners votes
rwillett replied to rwillett's topic in General Discussion
So the final lists are here, all 500 songs. Its easy to see from the list below that it's all grouped around the 1970's, 1980's and early 1990's. This is borne out by the decades table for the whole 500 This is the list before the last 70 songs and now after the whole 500 songs The 1970's and the 1980's increased their percentage of the songs at the expense of the other decades. Basically more 1970's and 1980's songs in the last 70 songs today. The top band were indeed AC/DC who had the same song recorded 21 times but with different titles (joke joke). Five in the top 50, so 10% of the top 50 were AC/DC. Their average position was 187. Second was Led Zepp with 19 and an average position of 203 Joint third on the list with 18 were Queen (average position 302) and Black Sabbath (average position 229) The average year of the top 10 was 1981, songs 11-20 average year was 1978, Songs 21-30 average year was 1976, Songs 31-40 average year was 1983 and Songs 41-50 was 1980. The oldest song was Chuck Berry - Johnny B. Goode, 1958, which only came in at 418 (travesty IMHO) The newest song was Shinedown - A Symptom of Being Human, 2022, which came in at 259. There were only 50 songs this millennium and their average year was 2008. I make no comment on the quality of the songs (apart from Chuck Berry), I am merely your humble scribe and data analytics person. Enjoy Rob -
Planet Rock - Top 500 - Interesting listeners votes
rwillett replied to rwillett's topic in General Discussion
I've been stuck in a meeting for the last two hours. Highly productive but have missed the top 10 which is annoying.... And I've just been told there's two songs left. Ah heard #2 Rob -
Perhaps somebody on Basschat is local to you who can help with the cutting? My knowledge of the East Anglia area is zilch so can't comment. One option might be to clamp or screw down a length of straight wood on the inside of where the cut should be and to slowly cut through with a hand saw. That's how it used to be done anyway. If you go off the edge, at least it's on the waste side of the wood. That's one of the most difficult bits, the others (to me anyway) are cutting the large hole for the speaker and the port hole. I used a cheap trim router, but it could be done using a small hand saw. I am very happy to print you off the port pipe for nothing and post it down. If you are concerned about making a mess the speaker hole, I can also print you a little cover for the edges to hide any mistakes, that's the thing below. Its amazing what you can hide if you try hard enough There may be other options that people can suggest. If you were closer, you;d be welcome to come round and do it here or take some tools off to try. Rob
-
Planet Rock - Top 500 - Interesting listeners votes
rwillett replied to rwillett's topic in General Discussion
and as if by magic -
Planet Rock - Top 500 - Interesting listeners votes
rwillett replied to rwillett's topic in General Discussion
THis is yesterdays split of decades and here's todays Every decade has seen a decrease in % apart from the 1970's and 1990's staying the same. So as we move closer to the top 70 or so, its the 1970's that are starting to dominate as evidenced by Black Sabbath starting to catch up with Queen. I never thought of that, that's a good use of the analysis. This is it so far And Massive Attack has been updated to 2016 rather than 2026 Personally I know very few of these bands so will look into them. Rob -
All the credit should go to all the people who did this before me. I didn't do anything clever but just followed other people and make my own mistakes. There's an awful lot of help here, freely given, for how to make it and make it work well. You don't need lots and lots of specialist tools, it can help, but a lot of people have found cheap and easy ways to do it. (That's a compliment BTW). I will be doing a second cab, and it will be made slightly differently as I have learnt what works and what doesn't. I may list all my mistakes so you can learn from them, but that might require a lot longer thread. For anybody who is thinking of building one, do it. Enormous satisfaction at the end which is nice, but you also get a good insight into what's needed. If I can do it anybody can. Rob
-
Planet Rock - Top 500 - Interesting listeners votes
rwillett replied to rwillett's topic in General Discussion
Here's the latest and broken down by Decade. The 1970's and 1980's still dominate. Queen are still top with 17 Black Sabbath are now second with 14 R with AC/DC and Led Zepp on 13 -
The more I played, the more i liked the cab. The Gnome (which is technically a bass amp) suits it very well for both bass and guitar. I don't have any experience with other small amps so can't comment on the Elf but suspect it would be equally nice. Putting a bass through it, no compression or any pedals sounded great. The gain on the Gnome does make a big difference. It's far better than my Ampeg practise amp RB-108 but it's about twice the price in parts alone with the Gnome. I'll put some pedals on it as well as try it with some modellers, a Tonex and a Mod Dwarf. I'd like to get the Gnome set up with as flat a respective as I can. If I put a microphone into a Mac and ran Audacity would that be a good way to check the frequency response or would there be other recommended ways. It's great to have the Gnome attached on the top or the back as it's basically a small but loud combo. Hopefully a small and decent quality speakon cable will be coming soon. I showed it to the other half and she said how small but perfectly formed it was. The children (19 and 16 so not really children) thought it looked like Lego as well. Definitely a plus. Rob
-
Thanks for that. I had forgotten about that section, looks like the last time it was touched was nearly ten years ago I've plugged the Tele in, will plug the active Strat (heresy on heresy) in later and just have a play. The 8" cab is (to my ears) a very good cab for both guitars and basses. I would like to say it's my playing but I'm not that stupid (or egoistical). Rob
-
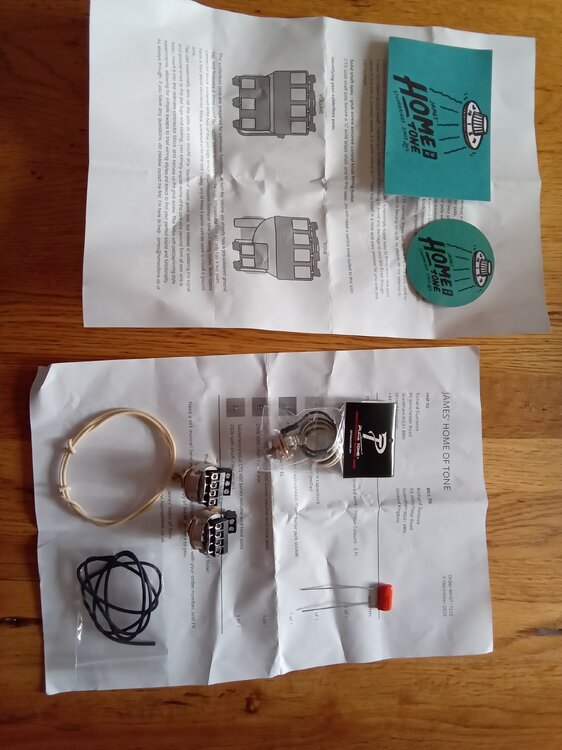 I don't need this, but I have brought from James Home of Tone before on three or four occassions and have absolutely no hesitation in recommending his products. Very well made and at £35 a bargain. Rob
 -
Not sure if I should even post this here... It might offend some people so I've hidden this below. If you are easily offended, then don't look. You can't say you haven't been warned
-
In a more serious vein, a second cab allows me to keep one connected in my "office" and one I can take out easily to jam with. I hate undoing all the connections and redoing them each time.
-
It sounds very good. Lots of midrange tone and very loud. I suspect I need to spend some time with it to work out the sound I like the best. Rob
-
Planet Rock - Top 500 - Interesting listeners votes
rwillett replied to rwillett's topic in General Discussion
My guess as to the top 10 is Stairway to Heaven Bohemian Rhapsody Freebird Hotel California All Right Now Highway to Hell Comfortably Numb Paranoid Sweet Child of Mine Smoke on the Water No idea to be honest... If there is anything from 2000 onwards, I'd be surprised. I make no claims on the merits of the songs. Rob -
Planet Rock - Top 500 - Interesting listeners votes
rwillett replied to rwillett's topic in General Discussion
I agree, it's completely rational and perfectly justified hatred. I'd put it on the same level as Bennie Hills "Fastest Milkman in the West". Mind you that song might come in in the Top 100, so we need to be careful for what we wish for. Rob -
Planet Rock - Top 500 - Interesting listeners votes
rwillett replied to rwillett's topic in General Discussion
Not sure how Massive Wagons have a song in 2026, but thats the date Planet Rock have put down. Most of these are "newer" than 1970's and 1980's but I am no expert Rob -
If @neepheid is going to the show. I'll need to make sure I'm away that weekend lest he entice me into bad ways such as buying things 😊
-
Planet Rock - Top 500 - Interesting listeners votes
rwillett replied to rwillett's topic in General Discussion
An updated list based on yesterdays plays. By year This is the new one, slightly more in the 1990's than before. Queen still has the most entries with 15 followed by Black Sabbath with 12 and AC/DC with 11 and Led Zepp with 10 The 1970's and 1980's still dominate Rob -
The cabs are stackable so relieving the stress on my two slipped discs 😁
-
Why not 🙄
-
Finally got the top coat on and the other bits attached to the speaker. It's basically finished. As it's really a deep black, there's not a lot of detail that can be seen on camera. The Gnome goes on the top or at the back You can see the rails here for front and back with the grab handles Here's the grill attached It definitely has a chunky Lego or kids toy vibe to it That's one down, I need to mull on the lessons learnt and then do Cabinet #2. Rob


