Jump to content
Why become a member? ×

benh

Member
  • Posts

    574
  • Joined

  • Last visited

Everything posted by benh

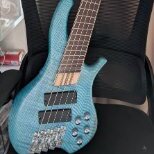
  1. Edit: reduced to £400 for quick sale. 2nd edit: now sold! As the title suggests! Bought last year, had home use only. Mahogany body with flamed maple top, matte finish in black cherry. Maple/wenge neck through, wenge fretboard. Has licensed Hipshot Ultralight tuners and a Hipshot Transtone bridge. Took out the slightly lacklustre Bartolini MK1 electronics and replaced with Delano SBC Driver pickups, and Sonar 3 3-band preamp. Super versatile setup, pickups are switchable between single coil, series humbucker and parallel humbucker with 2 3 way switches. Bypass switch for passive operation, and 3 way mid frequency selector switch next to mid control pot. Set up with Ken Smith Rockmaster strings, .45 - .130. Action is between 1.5mm and 2mm @ the 12th fret at the moment, plays lovely. Reluctant sale but needs must unfortunately. Any questions, please ask. EDIT: price is now including postage - I'll happily package in the original cardboard and bubble wrap, or if preferred I can courier in a hardcase for an extra £30.
  2. That looks amazing! Congratulations!
  3. benh

    Got wood?

    Spalted alder top, self build 🙂
  4. Now sold. Edit: Price drop to £25 including UK postage. 5 string Sandberg Bridge in black. Bought new for a project, fitted and strung up once before changing to alternative bridge for tighter string spacing. Includes screws, allen key, cloth and instructions for use. Adjustable string spacing from 58-60mm. Price includes postage.
  5. Thought I'd post this as I did a fair bit of trawling online (not trolling) and emailing back and forth with EMG to find wiring diagrams for non "Quik Connect" wiring, so I thought I'd share it in case anyone else has the same setup as me. In this case 2 diagrams, for wiring the pickup to a dpdt 2 way switch instead of a push pull. Also, wiring for resistors to normalise the volume between single coil and humbucker modes. Hopefully it helps someone!
  6. Looks great! I agree with the above, much prefer the small control plate & no scratchplate 👏🏻
  7. Thanks Mark - eagerly awaiting plugging in and playing with the preamp!
  8. Thank you! And yes, I'm already planning the next one in my head 😂
  9. Thanks Tony! There's a lot I'll do differently next time, the routing could be much cleaner and you may have spotted a slight repair to the neck behind the first 3 frets where I sanded through to the truss rod cavity 😂 but it's all a learning curve. It's been a weird dichotomy of being both easier and much harder than I thought it would be!!
  10. Ta da! IT'S ALIVE! Going to leave the strings on for a day or so and do a proper set up before testing.
  11. Waiting for the final coat to dry/cure on the body, so got some fretwork done today.
  12. WOW 😳 what a stunner!
  13. Great job, looks fantastic!
  14. Getting close now 🙂
  15. Each one as lovely as the next - lovely!
  16. First coat on the body - 1:1:1 oil based poly varnish, boiled linseed oil and white spirit. Used to use this mixture when finishing oak doors and architrave in a previous job, always worked well.
  17. Finish test!
  18. Thanks Andy - I'm excited about giving it a try, as it'll be my first filter based preamp and I'm trying to get my head around how it works. Looking forward to the glorious reveal!
  19. Did you manage to get any recordings sorted @Andyjr1515? Following with interest as I have one of @mhoss32's wonderful filter preamps ready to go in my build, and can't wait to hear how it sounds 🙂
  20. Getting closer! Ditched the brown stain for black, and much prefer it.
  21. Stained the back and sides, and made a control cavity cover + truss rod access cover today.
  22. Making a start on refining the body shaping - used a roundover bit in the router first, then on to rasps. Work in progress!
  23. Couldn't resist a quick mock up!
×
×
  • Create New...