benh Posted September 22, 2025 Posted September 22, 2025 Well - after a rather lengthy hiatus due to work/family/mental health and all that jazz, had the wood kicking around for this for ages so decided it needs doing. Decided to go full DIY (sans hardware) - winding my own pickups and making a preamp! Doing this as more of a "proof of concept" than anything else, as I've never built a multiscale bass before, or indeed put a preamp together. Bit late posting as most of the process is done now, but hopefully is of interest to someone! First of all, as always I spent a good few evenings designing in Inkscape, here were the results: 7 Quote
benh Posted September 22, 2025 Author Posted September 22, 2025 Woods chosen were a big slab of flamed ash for the body, flamed maple and ovangkol for the neck (7 piece laminate) and wenge for the fretboard. Usual glue up pics! 3 Quote
SpondonBassed Posted September 22, 2025 Posted September 22, 2025 5 minutes ago, benh said: hopefully is of interest to someone Me, for one. I have been collecting timber and hardware for one of these myself. I'm wondering what strings you will use. 33-35.5in scale length suggests a standard set might fit with the possible exception of the low B. 1 Quote
benh Posted September 22, 2025 Author Posted September 22, 2025 48 minutes ago, SpondonBassed said: Me, for one. I have been collecting timber and hardware for one of these myself. I'm wondering what strings you will use. 33-35.5in scale length suggests a standard set might fit with the possible exception of the low B. I just got a Dingwall nickel set for ease - reasonably priced and they fit well 1 Quote
benh Posted September 22, 2025 Author Posted September 22, 2025 Marked out the fretboard for cutting slots - basically made a small mark for each fret using both scale lengths, from the parallel fret (in this case I settled on the 9th). Then joined those marks up very carefully using a 0.5mm pencil. Used a planed offcut of the body clamped to the top as a guide for each slot as a precaution, which worked really well! 3 Quote
benh Posted September 22, 2025 Author Posted September 22, 2025 Fretboard "binding" was done by layering 1.5mm ash veneer with the offcuts of the wenge planed down to 0.5mm. Also routed the channels for the truss rod and the carbon rods, the latter of which I epoxied in place 4 Quote
benh Posted September 23, 2025 Author Posted September 23, 2025 Rough cut body shape, glued fretboard onto neck - plus obligatory mockup 2 Quote
benh Posted September 24, 2025 Author Posted September 24, 2025 (edited) Round overs done with 1/2in roundover bit, forearm contour with the trusty saw rasp and farrier's rasp. Neck carved the same way, then sanded, danish oiled and waxed. Ash headstock veneer to match the body and a denim blue stain started! Edited September 24, 2025 by benh Pics 3 Quote
Silky999 Posted September 24, 2025 Posted September 24, 2025 (edited) How do you finding using the machine inserts instead of screws on the neck? I have a set and keep meaning to try them but worried the drilling even though I have a pillar drill lol that laminated neck is gorgeous BTW! Edited September 24, 2025 by Silky999 1 Quote
benh Posted September 24, 2025 Author Posted September 24, 2025 Thank you! I really like them - to be honest if you're steady with a drill you can do it by hand relatively easily, although I used the pillar drill this time. Probably overkill but hey, I'm not a massive manufacturer just a hobbyist, and I prefer the look of the hex head machine screws 1 Quote
Silky999 Posted September 24, 2025 Posted September 24, 2025 (edited) Same as me….building basses is a hobby/side hustle which is good for my up and down mental health and something I am doing as a plan for some extra cash and keep my brain active when I finally retire lol. i haven’t summoned up the courage to do necks yet so just buy Chinese ones and modify/titivate them to bring them up to scratch. I will progress to doing them when I get a neck radius and fret slotting jig but as they say….Rome wasn’t built in a day! Edited September 24, 2025 by Silky999 3 Quote
Silky999 Posted September 24, 2025 Posted September 24, 2025 Oh, I have also now realised, like you, that you can never have too many clamps. 1 Quote
SpondonBassed Posted September 24, 2025 Posted September 24, 2025 I'll add a vote for inserts. I see photos of vintage basses where the neck comes off for inspection of manufacturing codes. I always think that eventually a thread will get stripped. Also, I think you get a better coupling between neck and body if you use machine screws. They're easier to torque evenly. 3 Quote
Silky999 Posted September 25, 2025 Posted September 25, 2025 (edited) 1 hour ago, SpondonBassed said: I'll add a vote for inserts. I see photos of vintage basses where the neck comes off for inspection of manufacturing codes. I always think that eventually a thread will get stripped. Also, I think you get a better coupling between neck and body if you use machine screws. They're easier to torque evenly. I will give them a go. Can you use them with neck plates or do they need ferrules? I normally drill a hole in the middle of the neck pocket to mount the bodies to a painting jig handle and cover with a neck plate. Edited September 25, 2025 by Silky999 1 Quote
SpondonBassed Posted September 25, 2025 Posted September 25, 2025 57 minutes ago, Silky999 said: I will give them a go. Can you use them with neck plates or do they need ferrules? I normally drill a hole in the middle of the neck pocket to mount the bodies to a painting jig handle and cover with a neck plate. I can't see why it wouldn't work with a neck plate. Countersunk allen heads in stainless are good. 1 Quote
Joe Nation Posted September 25, 2025 Posted September 25, 2025 8 hours ago, Silky999 said: How do you finding using the machine inserts instead of screws on the neck? I have a set and keep meaning to try them but worried the drilling even though I have a pillar drill You can do it perfectly well with a hand drill, just get (or make) a drilling guide so the holes go in square to the face. Use some sharpie or tape around the bit as a depth gauge so you don't go too far. As far as making necks goes, just try it! As long as you're starting off with a cheaper piece of wood and are prepared to risk it turning into scrap, what have you got to lose? You don't need a bunch of expensive jigs, just lay it out carefully and take your time. The first one might be a bit wonky or maybe even unplayable, but you'll learn a lot and the next one will be better. Remember, if you wanted the best possible bass you'd buy something, but you actually want the best bass you can make! 3 Quote
benh Posted September 25, 2025 Author Posted September 25, 2025 15 minutes ago, Joe Nation said: You can do it perfectly well with a hand drill, just get (or make) a drilling guide so the holes go in square to the face. Use some sharpie or tape around the bit as a depth gauge so you don't go too far. As far as making necks goes, just try it! As long as you're starting off with a cheaper piece of wood and are prepared to risk it turning into scrap, what have you got to lose? You don't need a bunch of expensive jigs, just lay it out carefully and take your time. The first one might be a bit wonky or maybe even unplayable, but you'll learn a lot and the next one will be better. Remember, if you wanted the best possible bass you'd buy something, but you actually want the best bass you can make! Totally agree - before the I made my first neck I viewed it as something akin to witchcraft, once you do it once you realise it's actually quite simple, and is now by far my favourite part of the build process 1 Quote
benh Posted September 25, 2025 Author Posted September 25, 2025 12 hours ago, Silky999 said: i haven’t summoned up the courage to do necks yet so just buy Chinese ones and modify/titivate them to bring them up to scratch. I will progress to doing them when I get a neck radius and fret slotting jig but as they say….Rome wasn’t built in a day! Regarding fret slotting, I've used a simple box I made out of offcuts for pretty much all my builds - the first one I just marked out with a fine pencil and a square and cut by hand - worked a treat! 1 Quote
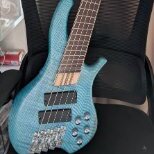
benh Posted September 25, 2025 Author Posted September 25, 2025 Body finished with Cosmoslac rattle cans, never used it before so was a bit of an experiment - so far so good 7 Quote
Silky999 Posted September 25, 2025 Posted September 25, 2025 11 hours ago, benh said: Totally agree - before the I made my first neck I viewed it as something akin to witchcraft, once you do it once you realise it's actually quite simple, and is now by far my favourite part of the build process that’s how I view it lol…..witchcraft and alchemy! How do you chaps radius the fretboard? A radius sanding beam or have you made fancy router jigs? Quote
benh Posted September 25, 2025 Author Posted September 25, 2025 No patience to make a router jig, no money to buy one 😂 I get most of the way with a hand plane and finish off with a radius sanding block 1 Quote
Richard R Posted September 25, 2025 Posted September 25, 2025 That's a great blue! What colour is that in their range? 1 1 Quote
benh Posted September 25, 2025 Author Posted September 25, 2025 58 minutes ago, Richard R said: That's a great blue! What colour is that in their range? Ah the colour is phthalo blue, it's a Crimson guitars water based stain 1 Quote
benh Posted September 26, 2025 Author Posted September 26, 2025 Pickups! Bought the bobbins and cases from AliExpress - dirt cheap, arrived in about 5 days so not bad time wise. Originally wound to 6500 turns per coil, reduced to 4250 as they were a bit on the dark side. Mild steel flat bar from eBay, cut to length with the angle grinder, ceramic bar magnet between the bars. I think they sound great 4 Quote
benh Posted September 27, 2025 Author Posted September 27, 2025 Now the preamp - a clone of the Darkglass Tone Capsule, there are schematics on various forums. Made on stripboard, I had most of the components already other than a few capacitor values and the IC, got them from Bitsbox. Works great 1 Quote


Recommended Posts
Join the conversation
You can post now and register later. If you have an account, sign in now to post with your account.