
.jpg.518c69c2d9e1581799f3c11301dc2da5.jpg)


Mylkinut
-
Posts
330 -
Joined
-
Last visited
Mylkinut's Achievements
")
Community Regular (8/14)
43
Total Watts
-
 Pm'd
Pm'd -
Last year I built this bass out of a MIM body and a '79 neck, and it was very nice. Too nice. It actually went together with such little stress that I didn't really bond with it. Plus, the blue wasn't really working for me. I'd been itching to pull it apart and try a different body with the neck, but this time I was going to pick something rough so the project lasted more than a couple of hours. I then found this body on eBay. I liked the fact that it was a single piece of mahogany, wasn't too heavy, and had a nice grain. It also looked to be in rough shape and had a pretty substantial flaw in the form of body filler making up a significant part of the neck heel. Plus it was only £75 - perfect. Once I received it I wasn't sure what to think. The routing wasn't great in areas, and the body filler looked way worse in person than online - let's just say £75 didn't feel that cheap anymore. Still, I decided to persevere because I'm all about type 2 fun. Looking closely at the grain, it looked to be filled with... something. I assumed it was a mix of paint and paint stripper after someone abandoned an attempt to strip it, so I opted to start off with applying more paint stripper to see what happened. I didn't take any pictures of this bit, but what it did was remove the left over stripper packed into the grain, revealing lots of black paint still sitting in the grooves below. My guess is this body was originally intended to be a natural finish, but was damaged during routing so repairing with filler and painting the body was the only way to salvage it. Someone later down the line then decided to strip the body, saw the body filler and must have jumped ship on the project. So, what to do? Given the paint looked so comfortably embedded in the grain, I decided the only way forward was to start sanding... ...and look at what was sitting underneath! Lovely, fresh mahogany. At this point I started to get optimistic that this might actually be worth doing. I started sanding with 150 grit, then moved to 180 grit, then decided that was enough (it was not). I also decided at this point that things were going so well that hiding the body filler would be easy (it was not). Once I decided I was done with sanding, I started thinking about how this bass should look. I felt it would be nice to honour the '79 neck and go for a 70s look, so the body had to be appropriately brown. I also wanted it to smell good, so danish oil was the obvious choice. Here's how the body looked after a couple of coats of oil. It looks alright in this picture, but what I couldn't get a decent shot of was a weird shimmering effect I kept noticing whenever light moved across the body. It would go away if I brushed the surface in one direction, but came back if I rubbed it the other way. I eventually worked out that I'd torn out some of the softer grain during sanding, causing a small amount of fuzz which, once oiled, made the body look like brown velvet. Very 70s, but not the right kind of 70s. My wife suggested lightly brushing the surface with a high grit sandpaper to take the fuzz off. I'm glad I married her because this worked like a charm - I chose 600 grit and sanded as gently as I could. This sorted the issue completely, so I went on to add another few coats of oil (5 in total). Here's what it looked like once done. I stopped at this point because I didn't want the body to be too shiny - this felt like a nice balance between an intentional finish and natural wood. The few bits of black paint still stuck in the grain gave it a nice patina too. Now came the issue of how to hide the body filler around the heel. At this point, the total seconds of thought I'd applied to figuring this out was still in single digits, and in hindsight I probably should have added to that total before starting work on it. I had vague notions of painting the filler to match the wood grain, but Googling this made it look very hard to get right. However, poking around on Amazon revealed a technology that was new to me: furniture touch up pens. These are basically felt tip pens in various shades of brown, designed to hide small marks on wooden furniture. I decided this large piece of body filler was nothing more than a small mark, so I bought some. Before I started with the pens, I used some 80 grit sandpaper to score the filler and give it some 'grain'. I then used pens in various combinations of 'oak', 'maple', 'mahogany', and 'walnut' to try and get somewhere close to the oiled mahogany. This is how it came out. It's not that close, but it's better than the white filler that was there before. Am I happy with it? Not really, but I coloured in a bass with felt tips like a toddler so I'm not sure I should be happy with it. It would be somewhat easy to reverse with nail polish remover, so if I suddenly get an idea that's actually good I can always try again. Now came the time to put this brown boy together, but as I offered various parts up to the body it became obvious I was going to have to drill a lot of new holes. First up was the bridge. I opted for a 1980s Schaller 3D largely because I already had it in my parts drawer, but I also love how these bridges look and function. What I don't love is the fact they don't use a Fender screw pattern (though I'm pretty sure they totally could with some tweaks), so some drilling followed. Next up was the scratchplate - this had been on a few Fenders in its life so I knew it was correct, but not one hole lined up. Much drilling followed. I then lifted the pickups and wiring out of the original blue body I had (why did I take that bass apart again?), and got it all into this one. This took some sanding in the cavity to get everything to sit flush, but more annoyingly the pickup screwholes were misaligned. Yet more drilling followed. I then went to fit the strap buttons, and noticed the lower one was about an inch off of centre. My drill was out of battery by now, so I just put the strap button in the hole that was already there. I guess it's extra character or something, but it does look a bit odd. The final touch was a thumb rest in the late-70s position. I already had a standard black one ready to go, but then out of nowhere a random eBay scroll revealed something I'd been hunting for for years (genuinely - years and years): the brass thumb rest from a 1980s P Bass Special. It was also priced very reasonably, so after losing my mind to the point of dropping my phone, I bought it. And bugger me is it heavy. So now I had a choice of thumb rests. Should I go for the subtle, light weight, sensible option? Or should I add needless extra weight in the form of a piece of bling that doesn't even match a single piece of fitted hardware? Obviously I went for the stupid option; It looks like a gold tooth, and goes well with the felt tip finish. After a quick set up, I'm calling this one done. I really like how this bass came out, and it was enough of a ballache that I actually feel attached to it now. Here it is with my '86 MIJ and '77, looking cool 😎
- 1 reply
-
- 7
-

-
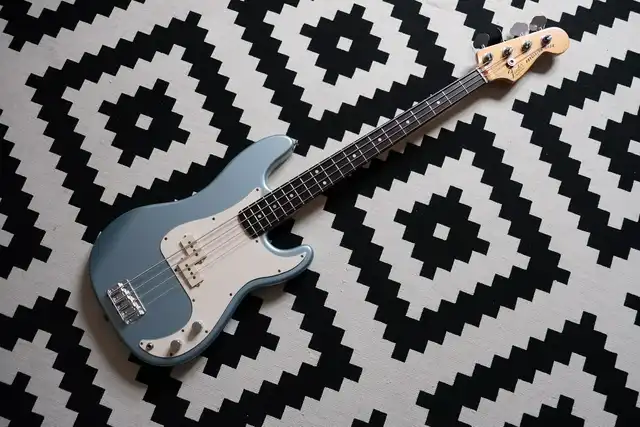 I'll preface this by saying I'm not sure if I want to sell this, keep it or mod it, but if there isn't any interest that'll make the decision for me. This is a bitsa I put together earlier this year - I've owned the neck since 2019 and slowly built up the rest of the parts. It's dead on 9lbs and has a lovely deep sound. The neck The neck's a late 70s Fender P S9 neck with a nice dark piece of rosewood and a B width nut. It's very shallow compared to both my '77's neck and the '71 I used to own. Super easy to play with a lovely worn-in feel. The headstock has aged nicely with lots of checking to the nitro. There's a decent amount of play wear on the treble side which has given it very rolled edges. The truss rod works as it should and the neck's straight. There's a high fret at the 12th, but even with it I manage to get an action I'd expect most would be happy with - around 2mm at the 12th fret. The tuners and string tree are all original to the neck, as is the neck plate. The body The body's an early 2000s Fender MIM in Agave Blue (essentially Ice Blue Metallic with a different name). I bought it specifically for this build intending to add a second P pickup at the bridge, but I never got round to it. It has some wear which helps it match the neck - the most obvious is a pretty decent scratch on the front, but there are some dings on the edges as well. Other bits I've tried to match the age of the neck and body with the other parts I've used - here's a list: Pickups: Unknown but definitely old and with grey bobbins - I'd say 70s Fender if they had date stamps, but without them they're very hard to ID. I've added cream pickup covers for some 80s cool points though. Pots: CTS Scratchplate: Kaish in cream Bridge: BBOT with one mismatched saddle - I planned to replace this with a Schaller 3D, but again never got round to it Strap buttons: Fender road worn Knobs: Fender chrome flat tops Strings: Fender 7250ML Why I'm thinking about selling I've already got a '77 P that I'll never sell, and while I think I prefer the neck on this I don't really need both. That said, it looks cool, sounds good and plays well so I'm not convinced I want to get rid. If I were to let it go I'd ideally be looking for a straight sale, but I could be tempted by trades for a Fender Elite P (maybe the 2016 version in the right colour, but definitely the 80s PP), or a Yamaha BB. I've got my Jazz, Stingray and PJ needs largely sorted but you never know, I like Fender-shaped things. I'm based in Southampton, and I'd be keen for any potential buyers to try it out so they know what they're getting. Cheers!
-
- 4
-
-
Looks so good - I managed to order a full Jazz set so I'm going to wait and see if they're a good match for the neck pickup I've already got. If not I'll send you a message!
-
Thanks - less of a how-to and more of a wtf-happened.
-
Ace, just found them - thanks for that!
-
So, some things to sort out. First, cream pickup covers. Looking at these pictures again I think they're a necessity. It'll look like a prop from a Wes Anderson film. Secondly, I've got an odd electrical gremlin to sort out. I couldn't find a wiring diagram that matched what I was trying to do so I had to sort of make it up. I'm getting an odd effect where turning off the J pickup also turns off the P, meaning the P can't be solo'd. I'll have to crack it back open and take a look. Also need to drill a hole for the one screwhole that doesn't match up on a ten-hole scratchplate. Easy.
-
Been at this one for a while, but it's nearly done so thought I'd share the story so far. I bought this '86-'87 MIJ P Bass from here a fair few years ago and it's been my favourite live bass ever since. It was stripped and stained by the previous owner (who admitted himself it wasn't a pro job), with the P pickup wired straight to the jack. I rewired it with a blend/volume/tone using what was already in the bass, and it's been totally reliable at least some of the time since. I used to love the DGAF aesthetic it had, but that feeling faded over time and I started lusting after a shell pink bass. So, having refinished a body once before, hating it and vowing never to do it again, I bought some nitro cans from Manchester Guitar Tech and got to work. First step: disassembly. It's a four-piece basswood body with a ton of dents and dings. I decided early on I wanted to retain that character and keep the body matched to the neck, so I wouldn't be filling any holes. The original owner mentioned it had previously been finished in black nitro, which was still hanging out in the cavities. I didn't know how the nitro I'd bought would take to whatever wood stain was already on there, so I opted to strip it before starting anything else. This was an effort. I know consumer-grade paint stripper isn't what it used to be (and for good reason), but I used an entire can and got maybe 30% off with some serious scraping. I took most of the rest off with sandpaper, but it was impossible to get it out of the ends of the grain where it had soaked in. Done. Stripping it did manage to take off a lot of the black nitro in the cavities, revealing that it was originally sunburst. Good bit of archaeology. Next up was paint. I made a jig out of a bit of scrap wood I had in the shed, and clamped it to my roadbike's maintenance stand. Everything I read said there was no reason to grain fill basswood (if that sounds like some foreshadowing, that's because it is), so I went straight to spraying it with most of a can of sanding sealer. This went on nicely and I started feeling like I was going to smash this; sanding it back down afterwards revealed what felt like a lovely smooth surface. I then went on to primer, and that looked decent but started revealing some issues. Now, what refinishing requires foremost is patience. I am not a patient man. Once the primer was on and drying, I started noticing a little grain showing through from the cut of wood used on the bass side of the body. I decided it didn't look too bad at this stage and figured it'd fill out with the colour and clear coats, so no worries. I just wanted to slap some pink on this bad boy. Here's what I had after I'd laid down a can of colour. You can see very visible grain on the forearm cut, something that seemed to become only more prominent the more colour I added. There was more on the belly cut, and some on the upper horn. I realised at this moment that I should have been more patient. I should have paid more attention at the primer stage, and probably stripped, grain filled and started again after the first coat of primer was put on. However, alongside impatience, one of my other superpowers is not knowing when to stop. So, I kept going onto the clear coat stage, bullheadedly assuming I could make it better by doing the exact same thing I'd done to make it worse. I ended up using two full cans of clear. During the second day of spraying, a total of two bugs flew in front of the spray nozzle and got propelled into the finish at considerable speed. At this point I was finding this project funny because so much seemed to be going wrong, so I didn't bother removing them. I hear they're good for tone anyway. Here I am regretting my life choices. The hardest part for me was waiting for opportunities to spray since I don't have anywhere to do it inside. Besides timing it between my job and my toddler napping, there had to be zero rain, low humidity, minimal wind, and nobody in neighbouring gardens. Again, I'm not a patient man so this was a challenge. Done. I have to say, I don't think I'd work with nitro again. I see the appeal because it goes on easily and wears very nicely, but it's bad for your lungs, your wallet and the planet. I'd happily refinish a bass again, but I'd probably experiment with other options next time. Next came waiting for 30 days before flat sanding and buffing. At this point I'd decided I'd spent a lot of money only to get a finish I wasn't going to be very happy with, but I was still excited to get it assembled and have one of my favourite basses back. Speaking of assembly, during the refin process I'd been gathering some parts. I wanted to rework the electronics and keep them to three holes so I could use a stock scratchplate, opting for a stacked volume control covering both pickups and a separate tone control. I already had a chrome Fender knob for the tone pot, so the hardest part was finding a stacked volume pot that could be used with a concentric knob I'd found that closely matched the Fender one. Luckily AliExpress and eBay sorted me. Almost of the other parts were reused from the original build. The exception was the scratchplate. I was originally going to go with standard white, but after watching an awful lot of Miami Vice after my second baby was born a few months ago I opted for an anodised gold one I had sitting in a picture frame upstairs. In my head it would fit tidily into this scene: What could be cooler? First though, I had to flat sand and polish. I forgot to take any pictures of this process, but I essentially wet sanded for a bit with 800 grit, before moving into 1200 grit. Unfortunately I burned through in a couple of places, but it's so inconspicuous I'm not worried. I then cycled to Halfords and got a bottle of Farecla G3, and started polishing with an old t shirt. This is when I got excited. Look at this. After all the balls-ups and doubling-down on those balls-ups, it buffed out to a super glossy finish. But what about the wood grain showing through on the forearm cut? It sanded out! I couldn't believe it. The belly cut and upper horn are the same. Admittedly the finish isn't 100% perfect (there are two bugs pummelled into it after all), but it's ten times better than I thought it might be after seeing the colour first go on. So, now it was time to start assembly and see my Miam-P Vice dreams come to life. First mock-up. I had some cream covers for a separate build, and I actually think they look way better than the black. However, I'm struggling to find a matched PJ set (or even a cream bridge J for that matter), so I'm sticking with black for now. And assembled. To me this is as cool as it gets, and I hadn't actually seen another bass in this colour combo before. So, feeling terribly original I proudly sent this picture to a few of my guitar-playing mates... ...and one of them said Fender had got there first. I still like mine better.
-
Thanks and yep, aware of the imperfections. I deliberately didn't fill any dents because I'm intending to knock some of the paint off around them; the neck and hardware are both quite worn so I don't want the finish to be in perfect shape. Might not work but hey ho. I'm going to carry on and see what I end up with, this is my first refin and being done when I can find the time so it's all a learning experience.
-
No worries bud!
-
Yours looks ace! Thanks for the info, that's pretty much the same as I've used - three coats of sanding sealer sanded back, three coats of primer, four coats of colour (though I haven't yet had any runs so no sanding back - I've got a tiny bit of spatter I'm going to scrape off with a razor and add another coat), then I'm hoping for five/six coats of clear. Ultimately I want the finish to look aged in-line with the neck, so a bit of grain showing through should only add to that. And no worries, I've got 35mm on the MIJ body, and 40mm on my '77 P Bass measuring from the bottom edge to the centre of the screw holes - wouldn't surprise me if some of the difference is down to a bit of 70s manufacturing slop and the thick poly finish on the '77. For the scale length, I measured my '77 and my Jazz and both hit 35 inches from the centre of the screw holes to the fretboard side of the nut. To be fair, I've just sold a '71 P that had the bridge located about a half inch further away from the neck than normal - apparently they were just like that for a few years. I still managed to get it intonated using a regular BBOT bridge so you've probably got a bit of tolerance - but I know I'd want to get it right too!
-
Ha, fair point! The bass is 35 years old, should probably look it. Cheers for this - I'm kind of leaning towards carrying on with it since I'm warming to the look and it'll get there with time eventually, it's just not what I had in my head. My wife didn't see the problem: 'it's made of wood right?' Interesting that it could happen with alder too. How many nitro layers did it end up taking to cover it?
-
Thanks, that's helpful. Since all I've got to lose is a can of clear and some time, I'll think I'll carry on and see where I end up. If it looks rubbish I can always strip it off and start again. It's a shame because the rest of the body looks ace, but you live and learn.
-
Looking at it again you can see the grain along the top horn too - looks like the wood used for that half of the body had an open grain, and the rest was much more closed. Wish I'd never started!


