
.gif.9ad672bb8b84505709f76b39c8c256ec.gif)


Matteo Marziali
-
Posts
16 -
Joined
-
Last visited
Content Type
Profiles
Forums
Events
Shop
Articles
Posts posted by Matteo Marziali
-
-
I like the body shape but I'd get ready for the inevitable comparisons to the Carl Thompson scroll...
This bass is TOTALLY inspired by Carl Thompson!.....
Finally a Video with some crappy samplesAnd some pics -
More picsThis the woods for control panel, I placed a Padauk layer under RosewoodHere is the shaped control panelKnobs layout, on the right a killerswitchThis is the jig to route the fretboard endThen I placed a Wenge cover on the end of the neckWhite plastic dots inside an aluminum pipeFretting job, I use a fret tang nipper found on Ebay, I needed to modify it to fit the fret. It works well for what it costs. And as you can see I use superglue in the slot.On the right the self made jig for filing the fret endsThe headstock with magnetic TR cover made out of Rosewood with Padauk accentControl panel on the bodyThe whole bass ready for the hardware
-
 3
3
-
-
Hello there!It's been a long time since my last post, also the second bass is done and gone, more than one years ago.Sorry for this delay, I think it's because of Instagram, I use to share pics there nowdays, you can follow me hereIf you remeber my customer want me to remove a part of the Padauk binding, this is how it looks after the jobAnd this is the fretboard-end, with the Padauk heel block and the Wenge center part of the bodyAnd here all the parts of the body, I used IKEA dowel pins to keep all these parts togetherAnd this is a trick to create a room for batteriesGluing the bodyMy offset template, I use a router bushingThe routed bodyWith the neck, front:and back:And this is the neck obviouslyThe body after routing and carving job
-
And a video with some samples:
Video -
Some pics of the "Traditional"
-
Shaping the 3 pieces Maple neckWith the frets onA detail of the Ebony binding and of the fret side. I found a cheap fret tang nipper on Ebay, it works fine.I routed the fretboard endThe back with some carving worksThe neck gluedHow does it look with the topCarving the heelThe carving on the back is doneI glued the top and I'm carving itRoom for the BartsHeadstock with custom TR coverFirst coat of oil varnish
-
I have not posted updates here for many months. Both basses are finished.I will show you some pics of the building, first the "Traditional".This is the Ash body glued and routed, front and backI glued a black veneer on the back and added the magnets for the back control plateHere how I cut the back control plate from the MapleMaking space for the magnetsI glued the back Maple wing using the back control plate to find the exact positionReady to route the extra long neck pocketThe bass with the neck on (not glued)and the back too.The back control plate is pretty goodAs you can see I had to enlarge the holes for the magnets to find the exact alignment, it's not so beauty, but I will cover with copper foil.Curly Maple backEpoxy with photoluminescent pigmentThe Buckeye Burl filled with epoxyand the headstockMy new logoThe top on the body with some hardware
-
@JTUK I hope my builds will look better than mockups! Ahahah
Seriously I think to get enough close, but as I’m not building replicas I have some freedom...
I started to build instruments 5 years ago, I built 7 basses and 2 guitars, and all this instruments currently works
But honestly I didn't have any furniture making skills, and I'm still not able to make forniture! A friend ( an ex violin maker) taught me how to use hand planer, chisels, scraper and how to sand the wood (he also gave me the [/size][/font]carpenter's table and some chisels!) and a guitar maker taught me how to do fretjob. I learned all the other things watching Carl Thompson videos on YouTube (I spent entire nights watching..) and in various forums.
I did all the fretboard inlays, I was at the first attempt with inlays, the block was not so difficult, instead the custom inlay was a real PITA! and radiusing deleted a part of itso I had to replace the missing parts...
Block inlay pics:This Paua Abalone is really awesome! After this pic a glued the blocks with Epoxy and Rosewood dust, then I glued Ebony bindings on the fretboard and then I glued it on the neck.Custom inlay pics:This is how it looks like before radiusing... it was almost perfect!...And here how I restored it:This is the extension to allow the use of long scale strings in this medium scale bass. Now I need to remove some Padouk binding, because for my customer it's too thick, I will route away the side of the neck and apply a Wenge binding under the PadoukAnd here both the necks with the fretboard on: -
Very inspiring!
-
[quote name='CamdenRob' timestamp='1450769563' post='2935579']
This stuff is agonising though and you're better off not actually having a choice! Presented with any of those as a finished bass I'd be happy, but having the choice leaves you forever wondering if you've chosen the right one!
[/quote]
You are right!
I will delete pics and topic immediatly after cut it! -
[color=#141414][font=verdana, geneva, lucida,]
 [/font][/color][color=#141414][font=verdana, geneva, lucida,]
 [/font][/color][color=#141414][font=verdana, geneva, lucida,]
 [/font][/color]
[color=#141414][font=verdana, geneva, lucida,]
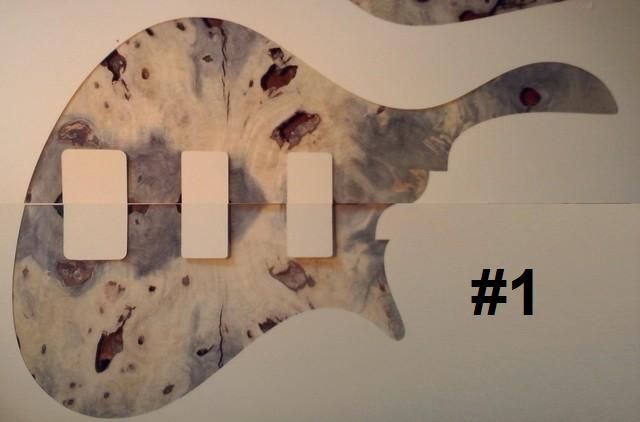
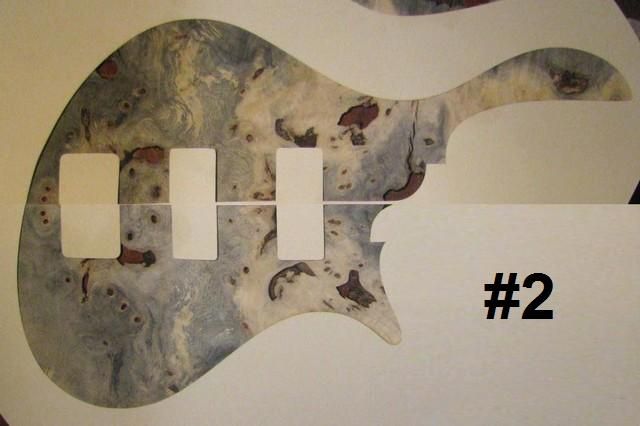
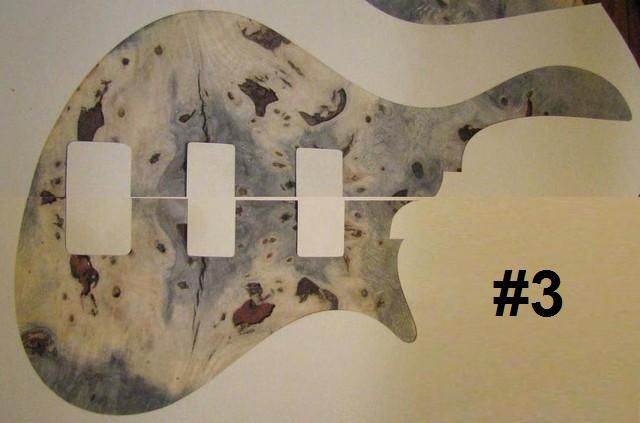
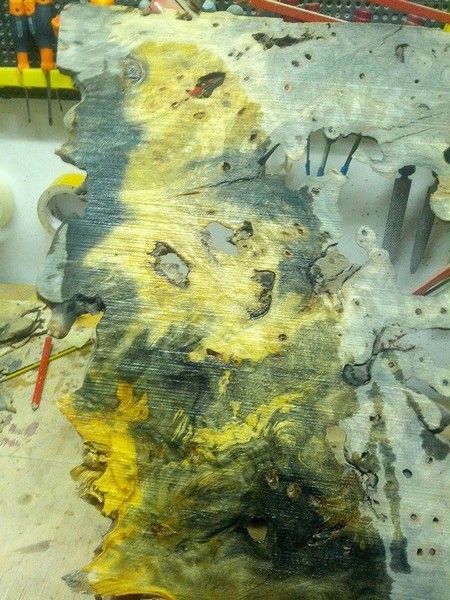
I have this piece of burl[/font][/color][color=#141414][font=verdana, geneva, lucida,]
 [/font][/color]
[color=#141414][font=verdana, geneva, lucida,]
Please help me to choose the best looking top.[/font][/color]
[color=#141414][font=verdana, geneva, lucida,]
thanks![/font][/color] -
Thank you all for the kind words of welcome!!
Slowly I'm working...Today I glued the skunk stripesHere you can see how I work on the skunk stripe in order to let it fit the truss rodClampingThe TR is glued with epoxy, skunk stripe with TitebondI also start working an the MOP custom inlay for the "Mio": I glue the MOP on Rosewwod, I cut a circle with a hole saw and I filled with epoxy and Rosewood dust.This is inlay design -
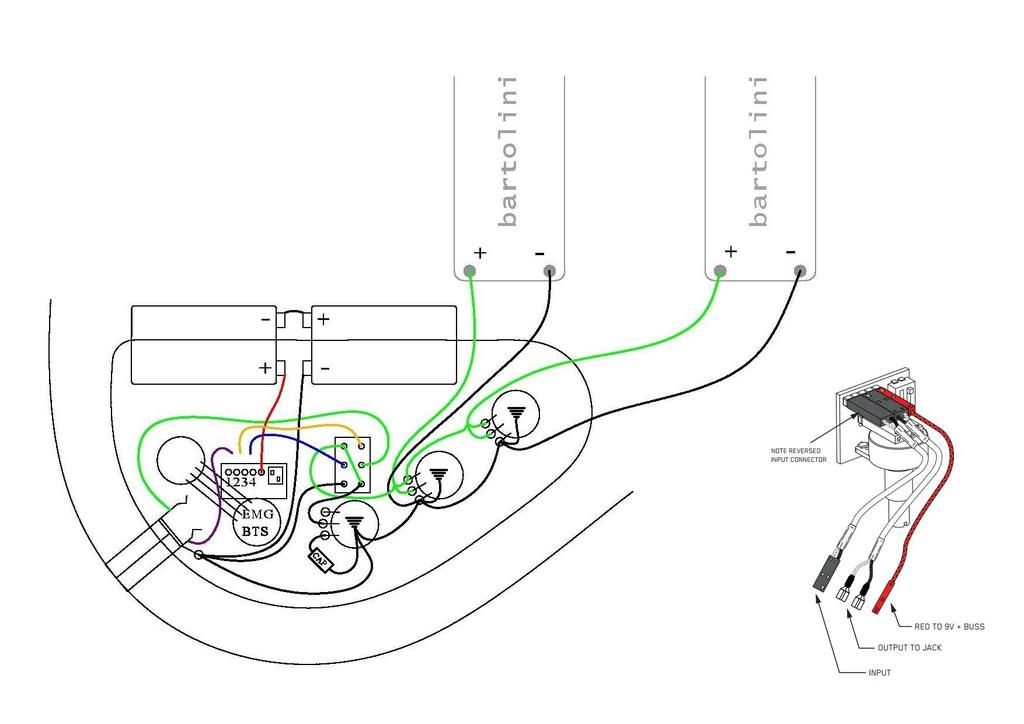
Hi there!
I need some help with this wiring, I had to put and EMG BTS preamp with 2 passive Bartolini pickups, with active/passive switch and tone pot only in passive mode.
Will 250 pots works for volume and tone?
Where i put purple, orang and blue wires? (All the colors are random...)
Will the battery still run in passive mode?
Thanks! -
Very strange body shape... I love it!
-
Hi there!
I'm a newbie in this forum, I'm an amateur bass builder based in Italy, I build 2-3 instrument per year, I started making Carl Thompson copies, but now I'm trying to find my own style.
I hope to learn a lot here, receive precious advices and share what I know.
Thanks- The first is for a Canadian guy, he want something that look like an Elrick, I proposed my model "Traditional" (like this), he want also a pair of Bartolini that will sounds good with slap technic, so I choose the new Singularity pickups: a single-coil jazz pickup in a soapbar shape. The Buckeye Burl top will be filled with photoluminescet epoxy, and i will place an Italian flag somewhere, because my customer is proud of his italian origins.
Spec:Handmade custom bass model "Traditional" with tonal chamber and sound hole34" scale24 medium jumbo fret (21 on E and A string)3 pieces Maple neckBuckeye burl headstock with Ebony TR coverSingle action Stew-Mac truss rodIndian Rosewood fretboard with Paua Abalone square "Gibson-style" inlayFretboard radius 12"Ebony nutThin neck width 38mm thickness 19,5mm at nutSet neck (glued in the body)Ash body chamberd with Buckeye burl top and Maple backTop filled with photoluminescent epoxyVarnished with Danish oilHipshot A style bridge blackHipshot Ultralite Y blackBlack strap lockA mockup:- The second is for a Swedish guy, initially he ask me to build a Claypool replica, but with different wood: Wenge, Padauk and Rosewood. I propose to him one of mine model (I called it "Mio" that means "My" in italian) and he accepted. This model shape is a mix between a CT Claypool and Ritter Roya, and with the body stripes, the tremolo bridge and this control panel it's very close to the Claypool bass mood. The customer immediately had very clear ideas about this bass, he want an EMG 35DC at the neck, a Bas-Mid-Tre preamp, a bolt-on Wenge-Padauk thin neck (I suggest a Ritter style multi-screws bolt), an inlay at 12° fret, no battery box in the back. He use to play in BEAD, so I choose a Kahler 2400f with forward saddle, in order to have more space to use D'Addario XL long scale strings, because it's not easy to find low-B strings for 32" scale bass, and also the headstock is 1cm forward; I choose .135/.100/.075/.055 strings gauges in order to have a light and balanced set.
Spec:Handmade 4 string bass model "Mio"32" scale24 medium jumbo fret (21 on E and A string)Wenge neck with Padauk stripesWenge headstock with Padauk TR coverSingle action Stew-Mac truss rodIndian Rosewood fretboard without dots, only on the sideCustom Inlay at 12° fretFretboard radius 16"Ebony nutThin neck width 38mm thickness 19mm at nutNeck bolt-on with multi-screwsWenge body with Padauk stripes, thickness 32mmIndian Rosewood control plateVarnished with Danish oilEMG BQS preamp (Bass - Mid/Freq.selection - Treble) 18v with KillswitchKahler 2400f tremolo bridge blackHipshot Ultralite Y blackBlack strap lockA mockup:In this mockups you can see my old "thompsonish" logo, but I will not use it anymore, I'm working on a new logo, as well as I'm working on my building style
_________________________________________________________________________________________________________This is the Buckeye burl for the top:My customer want to fill the burl with photoluminescent epoxy (it's my first time with epoxy...:And I will try ro recreate the color of the Paua Abalone inlay, I will try with different pigment colors.Some stuffThis is the wood for the second, the body:The neck:Fretboard and control panel:This is the Kahler 2400f tremolo bridge, a beautiful piece of engineering:I'm checking if the long strings scale will fit in this bass, they do!About woodworking:I cutted 3 pieces from a flat European Maple blank, in order to have a 3 pcs quartersawn neckWith an hand plane I planed one surfaceThan I planed the other side with my neck-blank-router-jig, in order to have an angle on the blank itselfHere you can see the angleI did the same with the Wenge-Padauk neck

Experimental Prototype bass... I hope
in Build Diaries
Posted
A stunning work here!